How To Take A Screenshot On Lenovo Laptop Or Desktop? Lenovo is a well-regarded brand known for manufacturing laptops suitable for both personal and professional use. Notable models from their lineup include the ThinkPad, IdeaPad, and Yoga series.
For beginners interested in learning how to take screenshots on a Lenovo laptop, this article outlines four methods, encompassing keyboard shortcuts, built-in tools, and a third-party application. Continue reading to select the method that best fits your needs.
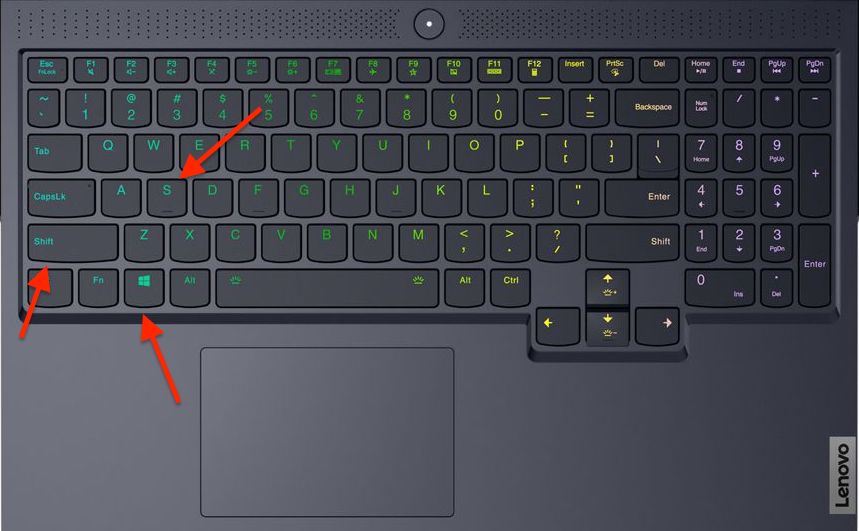
One of the simplest methods to capture a screenshot on a Lenovo laptop is by utilizing keyboard shortcuts. Various combinations are available to capture the entire screen, an active window, or a specific area. Here are the details:
How To Take A Screenshot On Lenovo Laptop Or Desktop?

1: Capturing the Entire Screen
There are two methods to take a screenshot of the full screen on your Lenovo laptop. First, press the “Print Screen” key, often labeled as "PrtScn" or "PrtSc," to capture the entire screen.
Read Also: How to Screenshot on Lenovo Laptop?
2: The screenshot will be copied to your clipboard, allowing you to paste it into an image editor or document for further use. Alternatively, you can press the "Windows" key along with the "Print Screen" key simultaneously to save the screenshot directly as a file on your computer. This file will be located in the "Screenshots" folder within your "Pictures" library.
Capturing an Active Window
To capture only the active window on your Lenovo laptop, follow these steps: Step 1. Open the desired window and click within it to ensure it is active. Step 2. Press the "Alt" and "Print Screen" keys at the same time to take a screenshot of the active window.
This action will copy the screenshot to your clipboard. You can then open the Paint application and press “Ctrl” and “V” simultaneously to paste the image. Finally, use “Ctrl” and “S” to save it to your Lenovo laptop.
Take a Custom Screenshot
To capture a custom screenshot on a Lenovo laptop, ThinkPad, or similar device, utilize the shortcuts to access the Snip & Sketch Tool. It is important to note that this tool is exclusively available on Windows 10 devices. Users operating on different systems may need to explore alternative methods for capturing custom screenshots.
Read Also: How To Permanently Delete Files From Lenovo Laptop?
Step 1. Go to the screen you wish to capture. || Step 2. Simultaneously press the "Windows" key and the "Shift" key, followed by the "S" key. This action will launch the Snip & Sketch tool.
Step 3. In the Snip & Sketch window, click the "New" button located in the upper-left corner and choose the desired snip type: Rectangular, Freeform, or Fullscreen. || Step 4. After selecting the area of the screen you wish to capture, the snip will be taken and copied to the Snip & Sketch window.
Step 5. Utilize the tools available in the Snip & Sketch window to modify the screenshot as needed. You can employ the pen, highlighter, and eraser tools for annotations or use the cropping tool to adjust the image size. || Step 6. Once you have completed your edits, click the "Save" button in the upper-left corner of the window to store the image in your preferred location on your computer.
How To Take A Screenshot On Lenovo Laptop Or Desktop?
The Snipping Tool is a built-in screenshot utility that comes with Windows 7 and later versions. It enables users to capture screenshots of the entire screen, a specific window, a freeform shape, or a rectangular area, along with options for editing and annotating the captured images.

To utilize the Snipping Tool on a Lenovo laptop, adhere to the following steps: Step 1. Navigate to the screen you wish to capture. || Step 2. Click the "Start" button, type "snipping tool" into the search bar, and press "Enter" to launch the application. || Step 3. Click the "New" button located in the upper-left corner of the Snipping Tool window.
Step 4. Utilize the mouse to create a rectangle around the specific area of the screen you wish to capture. Alternatively, you may click the arrow adjacent to the "New" button to choose a particular type of snip (freeform, rectangular, fullscreen, or window) from the dropdown menu.
Step 5. After selecting the desired screen area, the snip will be captured and automatically copied to the Snipping Tool window.
Read Also: How To Factory Reset Lenovo ThinkPad Without Admin Password?
Step 6. In the Snipping Tool window, utilize the available tools to modify the screenshot as needed. You can employ the pen, highlighter, and eraser tools for annotations, or use the cropping tool to adjust the image to a specific dimension.
Step 7. Once you have completed your edits, navigate to the "File" menu and select "Save As" to store the image in your preferred location on your computer.
As a browser extension compatible with Chrome, Firefox, Edge, and Safari, it enables you to capture screenshots of your Lenovo screen, crop images, add annotations, obscure sensitive information, upload screenshots to cloud storage, and share them with others.
Its distinguishing feature is the ability to capture screenshots of scrolling web pages. Furthermore, it allows you to take screenshots on an HP laptop, record the screen on your Lenovo laptop, edit videos, and more! Now, let us explore how to take a screenshot on Lenovo using Awesome Screenshot & Recorder. Begin by downloading and installing the Awesome Screenshot extension in your browser. Sign in or create an account to get started.
Read Also : How to stop YouTube shooting of videos on pc?
No comments